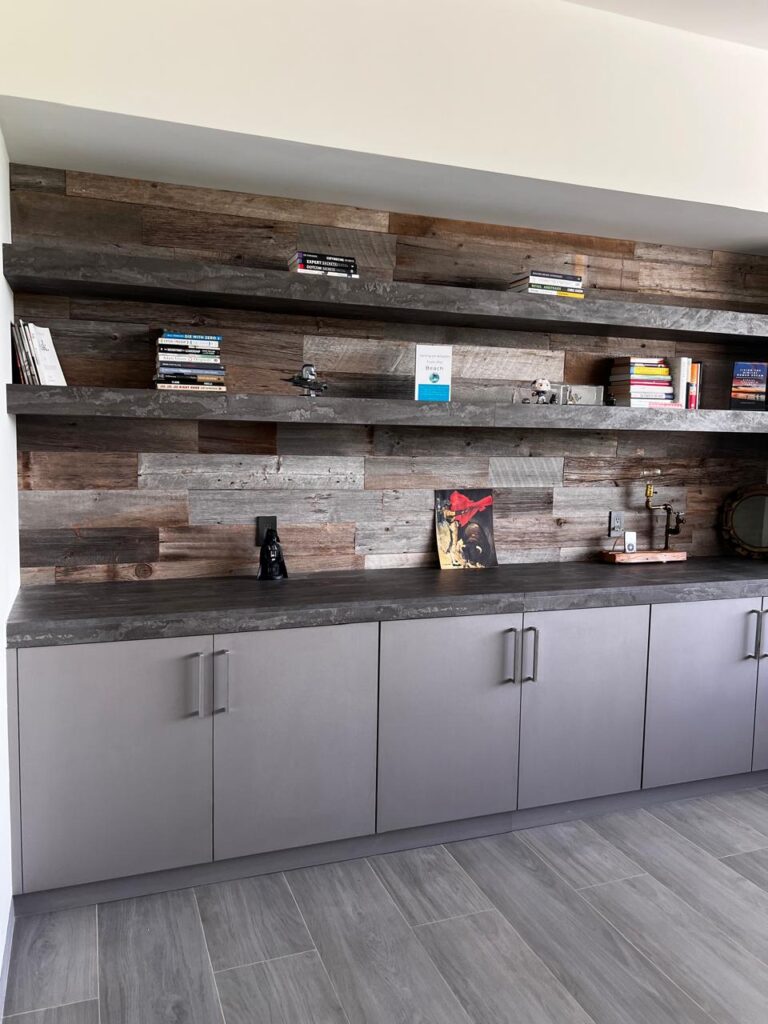
Adding a reclaimed wood accent wall is one of the easiest ways to transform a room with warmth, character, and authentic rustic charm. Recently, we installed our 5.5” wide reclaimed wood boards in my office to create a bold reclaimed wood feature wall and I want to share exactly how we did it. After all, I love the product so much I sell it, I defiantly want some in my house!
Choosing Real Reclaimed Wood
We used our 5.5” wide grey reclaimed wood boards for this project. Unlike manufactured panels that only look rustic, these boards are real reclaimed wood sourced from century-old barns. Each plank carries its own history, unique grain, and natural knots that bring true authenticity to the space.
Prep & Acclimatizing the Boards
Before starting, we placed the box of reclaimed wood boards in the room for over 48 hours. This step is important to let the wood acclimatize to the room’s temperature and humidity, minimizing any expansion or contraction after installation. Don’t cut it open from the wrapping around the wood, just let the wood settle.
Planning the Layout
We measured out the wall space on the floor and started laying out the boards to plan our design. Here’s how we approached it:
Mixed up board lengths for a natural look
Positioned the longest boards first, using them where full lengths were needed
Filled ends and partial spaces with smaller boards and took out a few that we didn’t quite like the shade or color
Moved pieces around until we were happy with the layout
There were a couple of knots we didn’t like, so we cut them off. But most knots stayed – that’s the charm and character of real reclaimed wood walls.
Installing the Reclaimed Wood Wall
Because this wall was cement, we first installed ½ inch plywood painted a dark color. Painting it dark ensures that if any small cracks or knots show gaps, you don’t see a bright color behind them.
We waited a couple of days for the plywood to dry before starting the install.
For installation:
We applied a large wave of adhesive on each board, covering edge to edge for a strong hold.
Started at the bottom of the wall, working our way up.
On each row, we alternated direction:
Left to right on one row
Right to left on the next
This kept the cuts evenly distributed so one side of the wall didn’t end up with all the short pieces.
Cutting Around Outlets
Cutting around outlets was surprisingly easy. We measured carefully, cut with a jigsaw, and placed the board in place before installing the next. We had white outlets but you can see we switched that for a black version since it just looked better.
💡 The Final Result
In just a couple of hours, our DIY reclaimed wood accent wall was complete. The mix of authentic knots, grain, and aged patina creates a feature wall that looks amazing behind my desk and adds warmth and inspiration to my workdays.
If you’re thinking about adding a reclaimed wood feature wall to your home or office, check out our full selection of 3.5”, 5.5”, and mixed grey & brown reclaimed wood boards. There’s nothing like real wood to create a space that feels warm, timeless, and unique like ours!