Sale
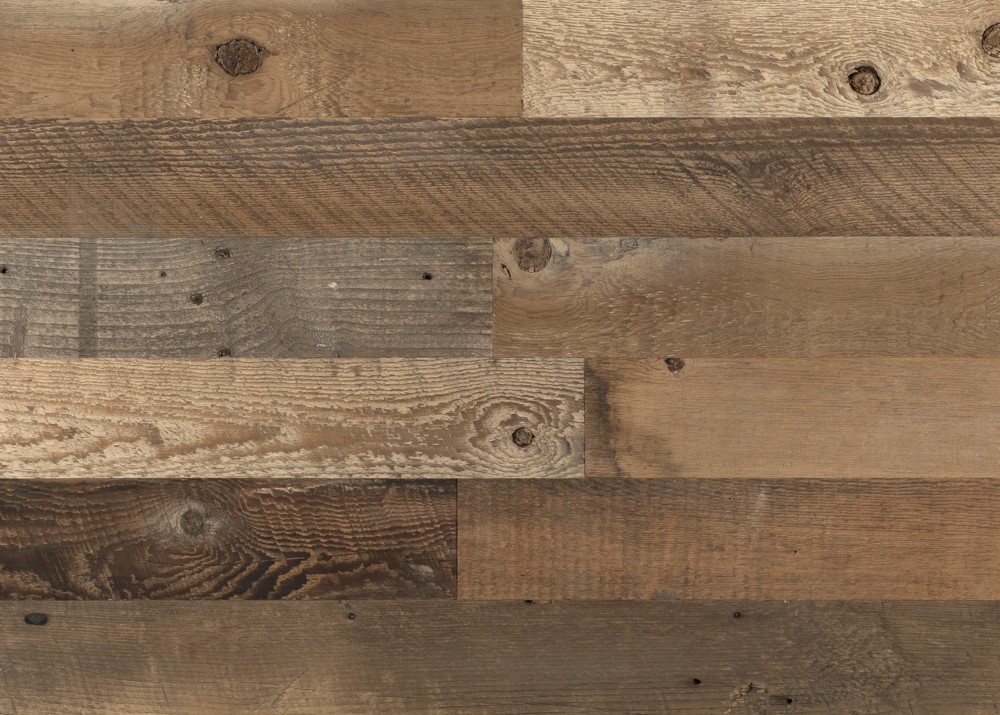
3.5″ Plank · Brown Natural
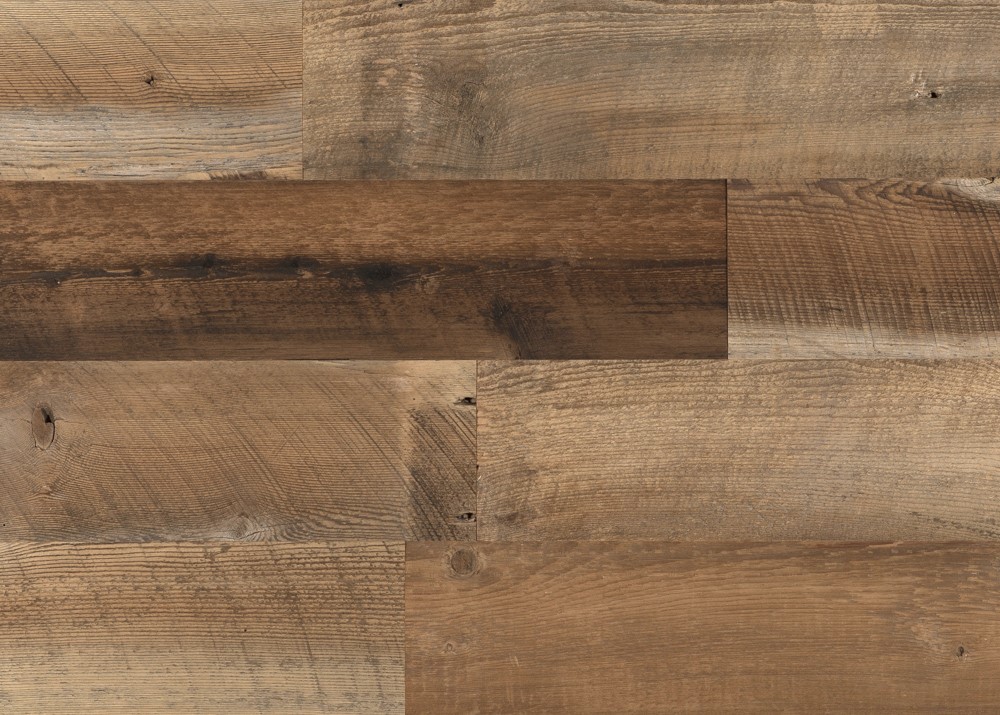
Brown Reclaimed Barn Wood
Warm brown tones with rich natural grain. Our most popular plank for cozy spaces.
$10.25$11.75/ sq ft
20 sq ft box · $205.00
Shop 3.5″ Brown →The fireplace is the one wall in your house that everyone looks at. Drywall and paint don’t do it justice. A floor-to-ceiling reclaimed wood feature wall does — and it’s one of the highest-impact, lowest-cost upgrades you can make in a living room.
Our planks are the real thing: pulled from American barns built more than a century ago, with the original saw kerf marks, square nail holes, and weathered patina you can’t fake. The same product hangs in Gordon Ramsay’s Hell’s Kitchen, the Baltimore Ravens NFL studio, and hundreds of Starbucks locations — and it ships to your door priced per square foot.

The single most common question we get about fireplace wall installs. Short answer: yes, as long as you respect your firebox manufacturer’s clearance spec.
Every fireplace insert sold in North America publishes a minimum clearance to combustibles. Modern direct-vent linear gas inserts typically require 6–18 inches of non-combustible material immediately surrounding the firebox — tile, stone, or steel surround — with combustibles (including wood paneling) starting beyond that line. Wood-burning inserts and older masonry fireplaces require more.
Our planks install outside the published clearance zone, the same way you’d install any wood mantel or paneling around a firebox.
Most call for 6–12″ of non-combustible surround. Plan a tile or steel band around the firebox opening, then run reclaimed wood from there outward and upward.
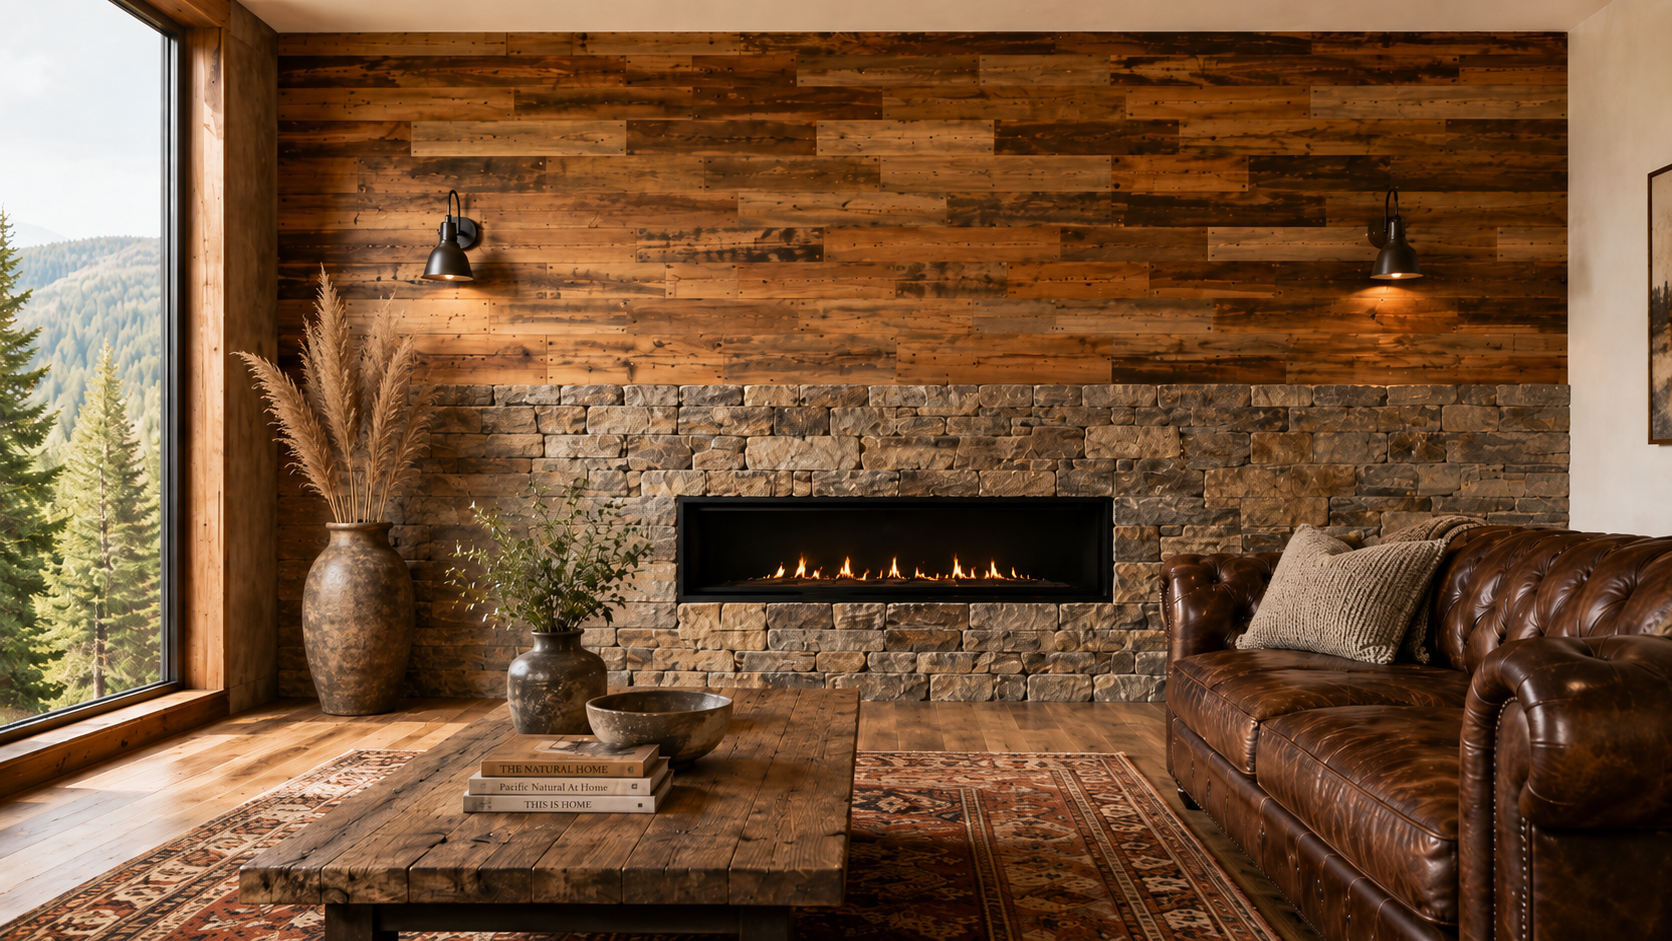
Larger clearance required — typically 36″ from the firebox opening. Stone or brick the immediate hearth and surround, then reclaimed wood for the upper wall and flanking areas.
Generate minimal heat. Reclaimed wood can install directly around the unit per the manufacturer’s spec sheet, often with no required surround at all.
You can install our planks directly over existing brick or stone using construction adhesive plus optional masonry anchors — no demo, no surface prep beyond a quick clean.
Most fireplace walls use one color, not a mix. Pick the look that fits the room you’re building.
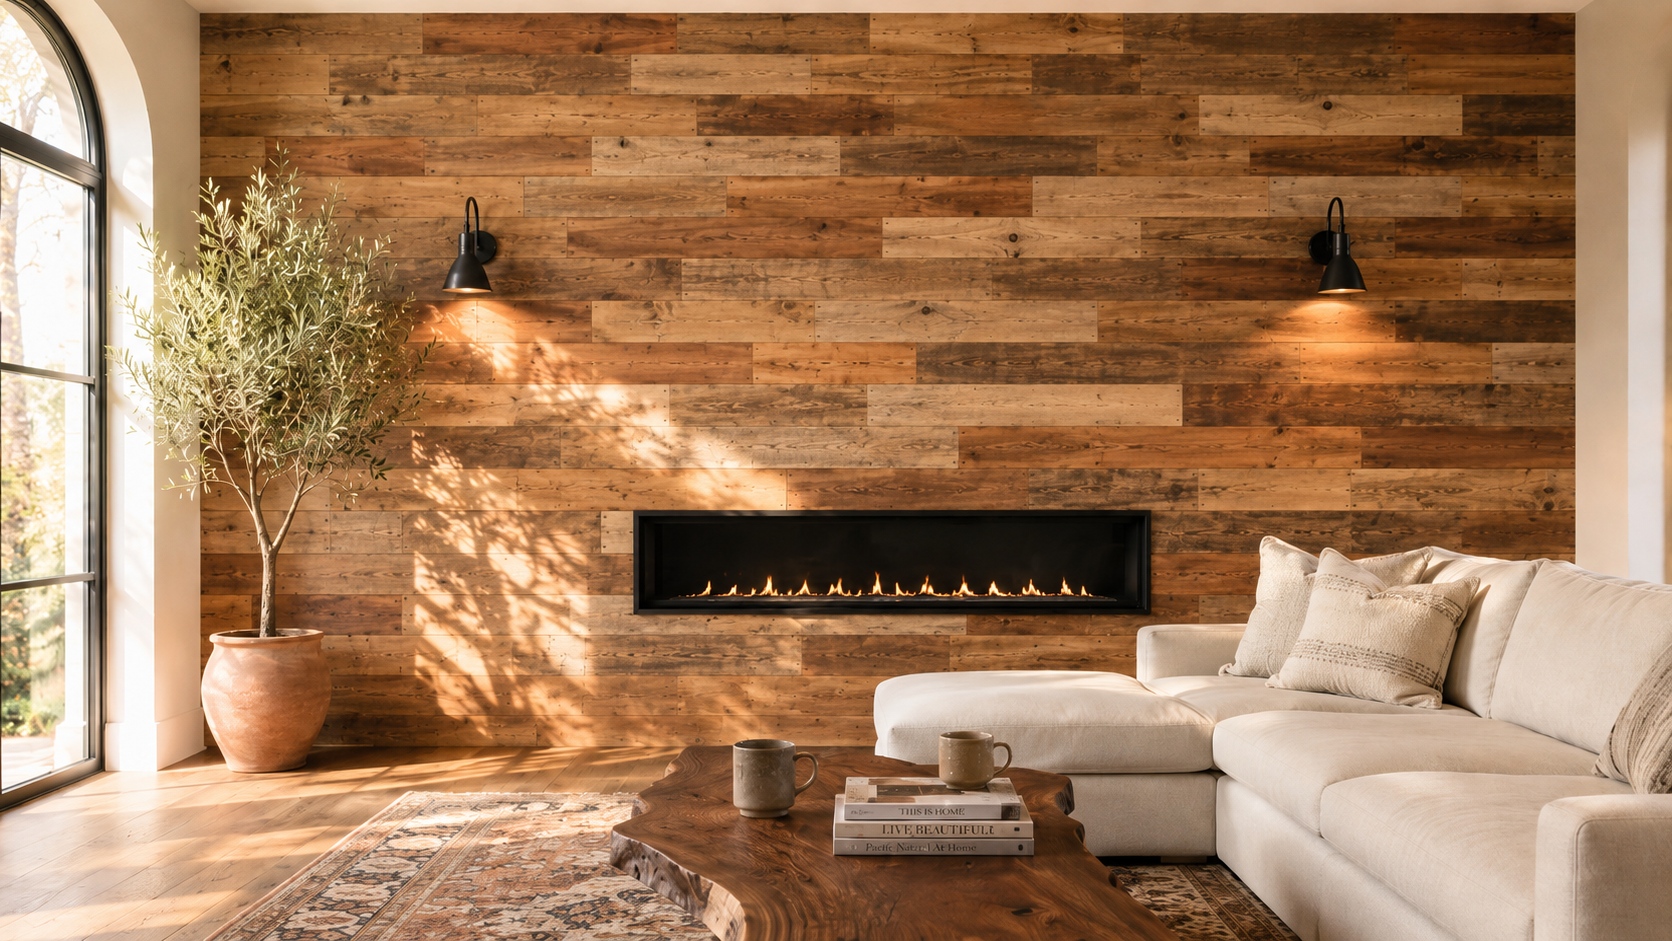
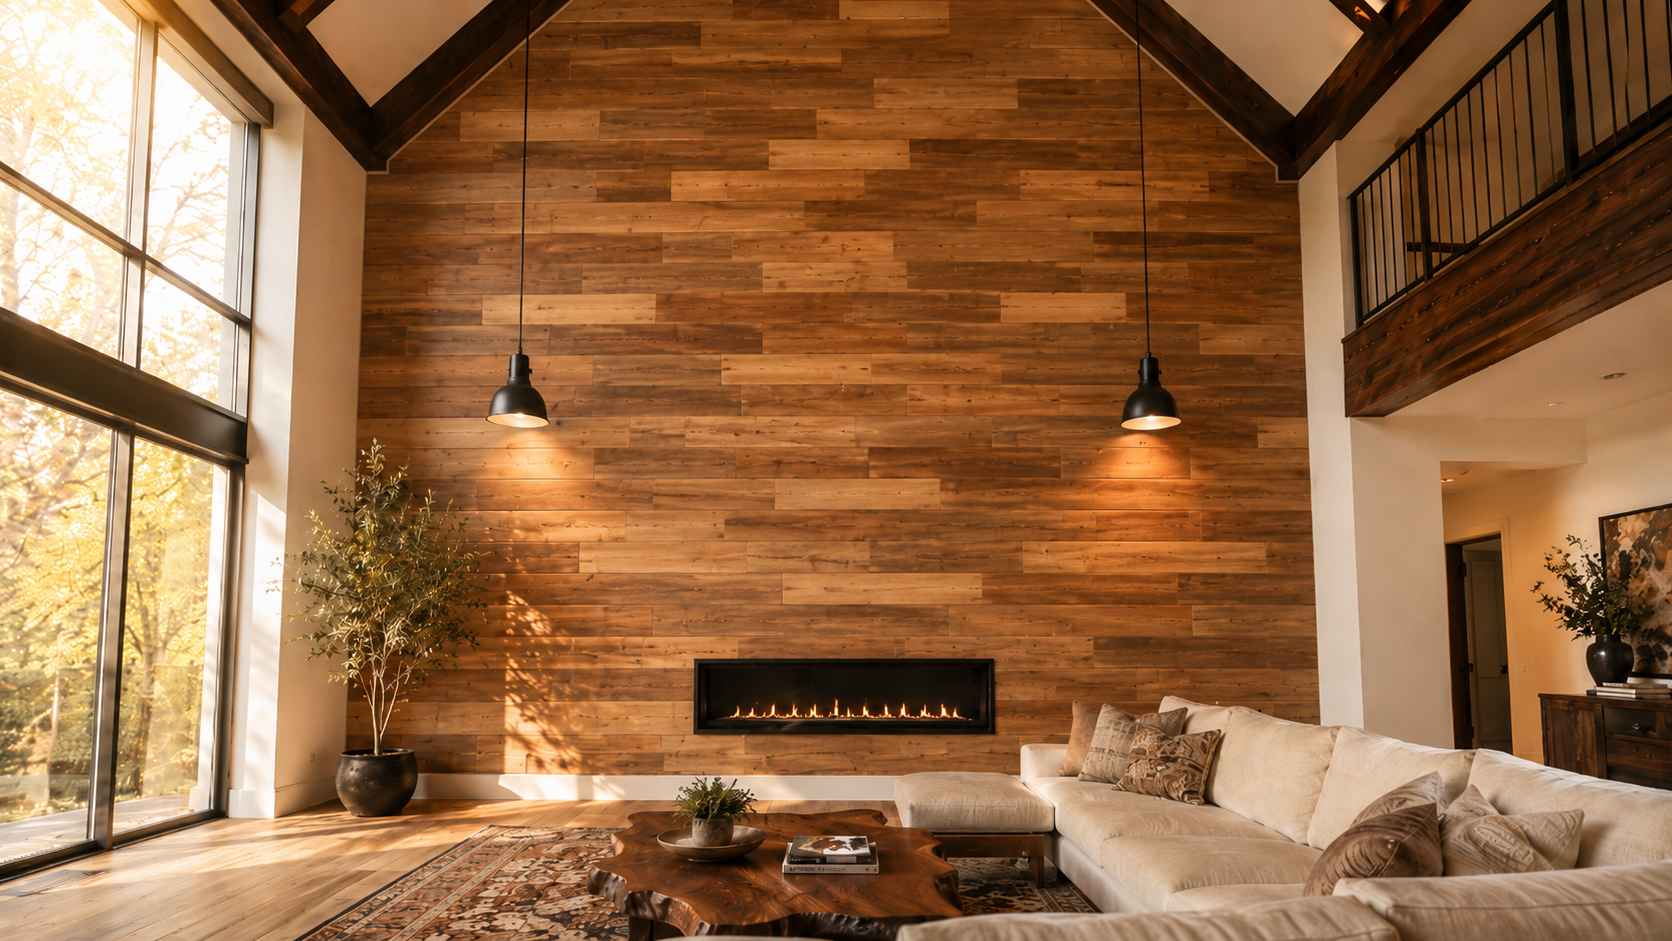
Walnut, honey, and amber tones. The choice for cabin retreats, mountain lodges, and farmhouse living rooms where you want the fire to feel like the heart of the home.
Shop Brown →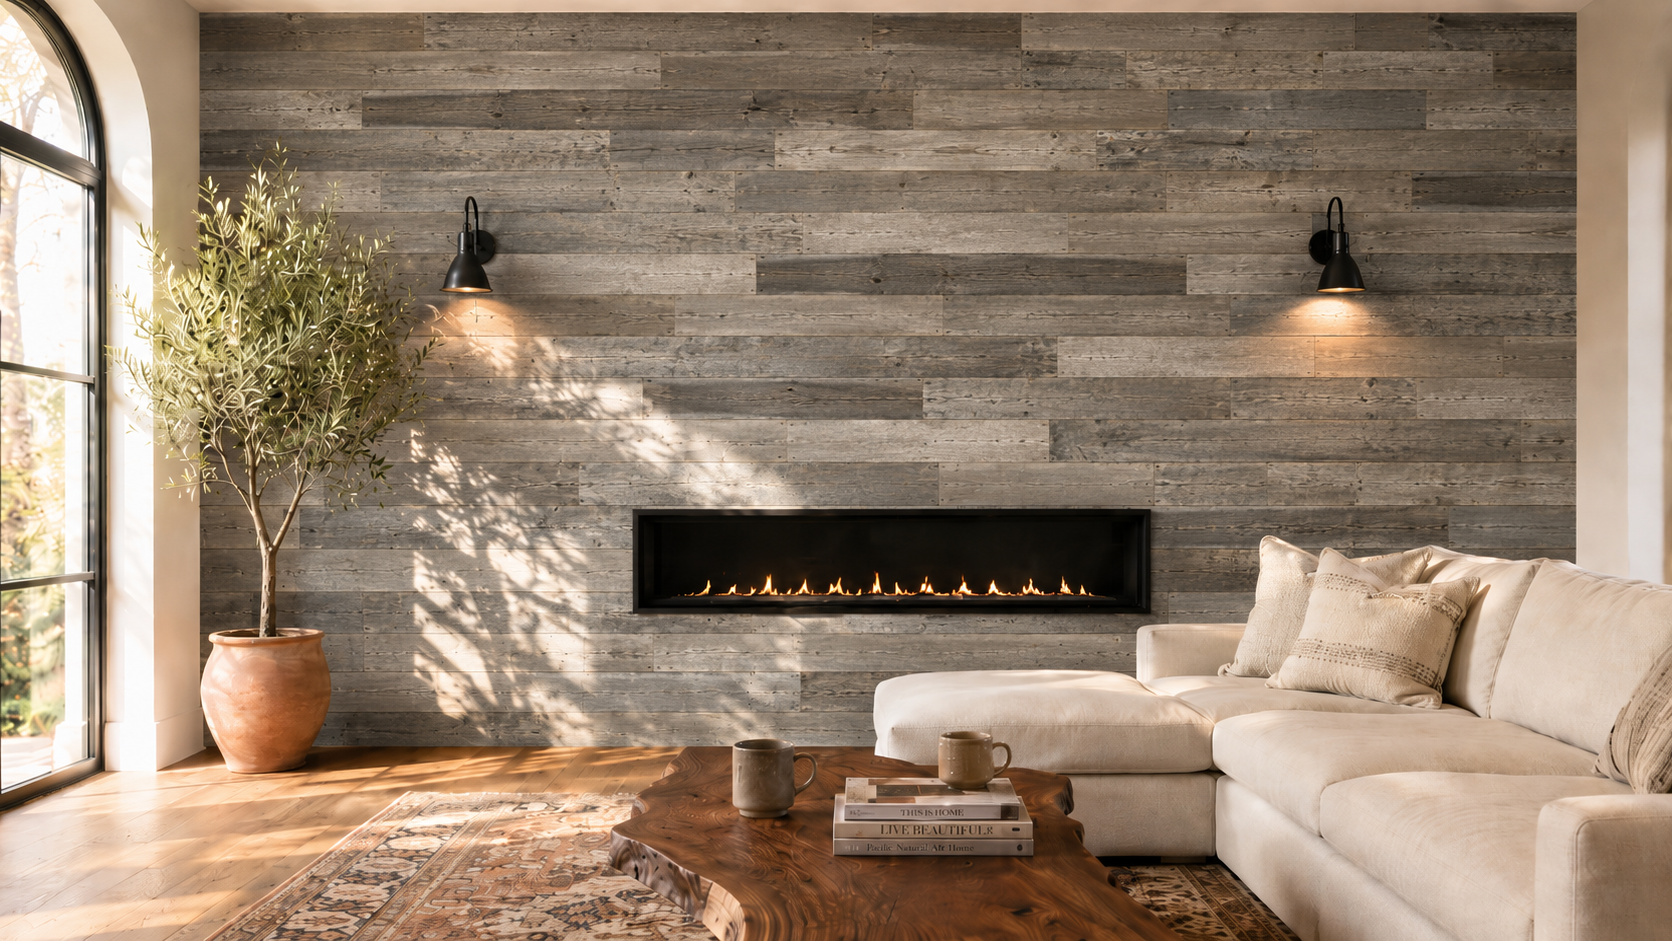
Silver, charcoal, and driftwood greys. Pairs effortlessly with white walls, marble surrounds, and black linear gas inserts — the modernist choice for contemporary living rooms.
Shop Grey →Four products. Pick a color and a plank width, enter your square footage, done.
Warm brown tones with rich natural grain. Our most popular plank for cozy spaces.
Wider boards, fewer seams, more dramatic statement. Same authentic barn wood character.
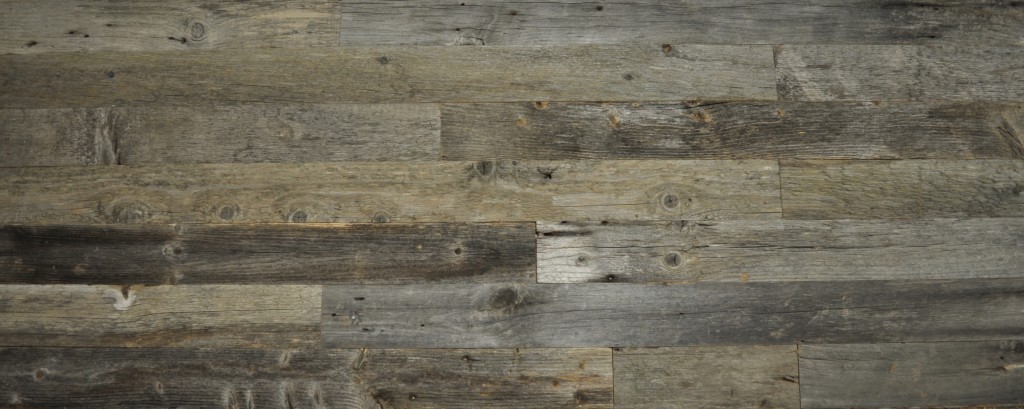
Weathered silver-grey patina. Perfect for modern, coastal, or industrial interiors.
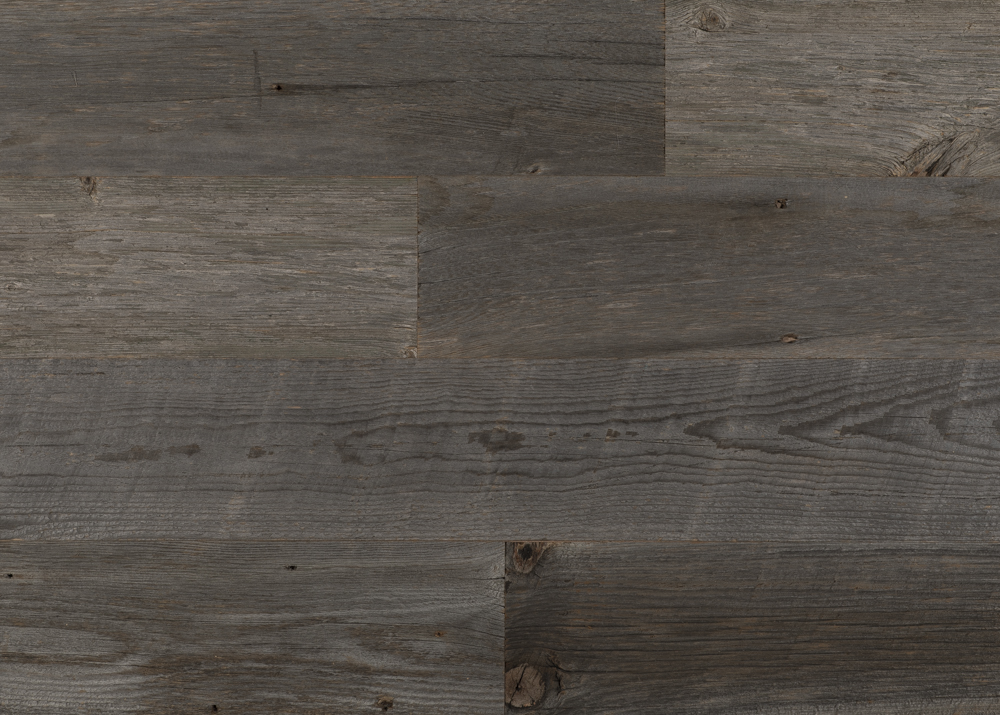
Bigger boards in our weathered grey. Cleaner lines, fewer seams, premium finish.
The same planks work in farmhouse, mountain lodge, modern minimalist, and traditional cabin rooms. Six real-world looks below.
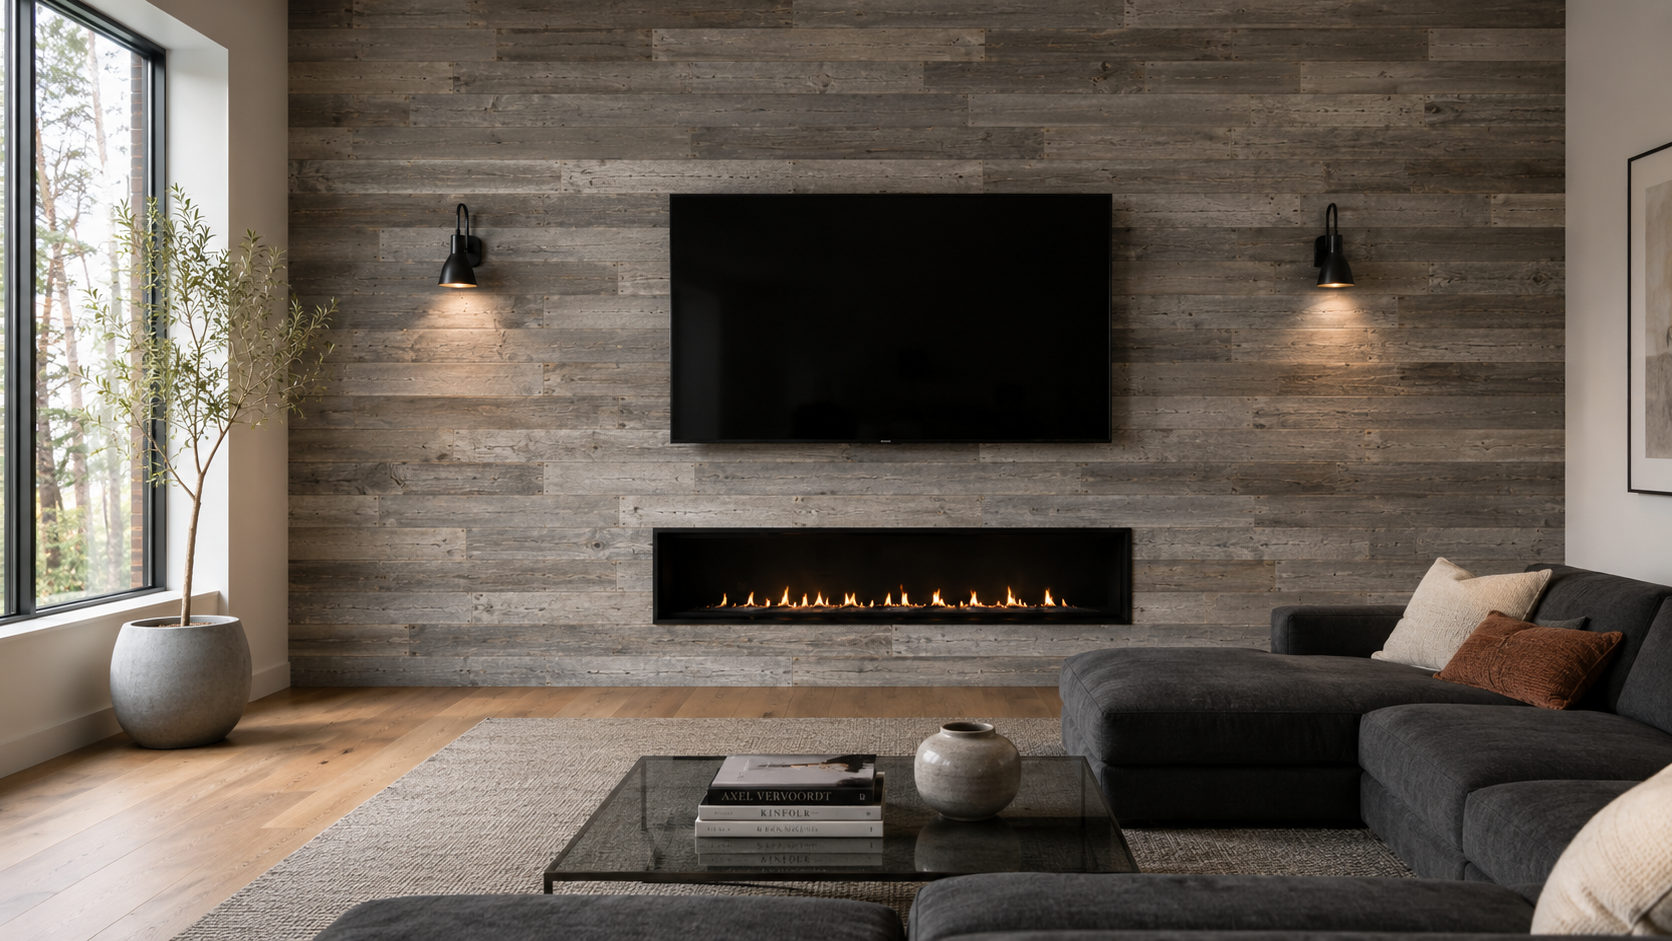
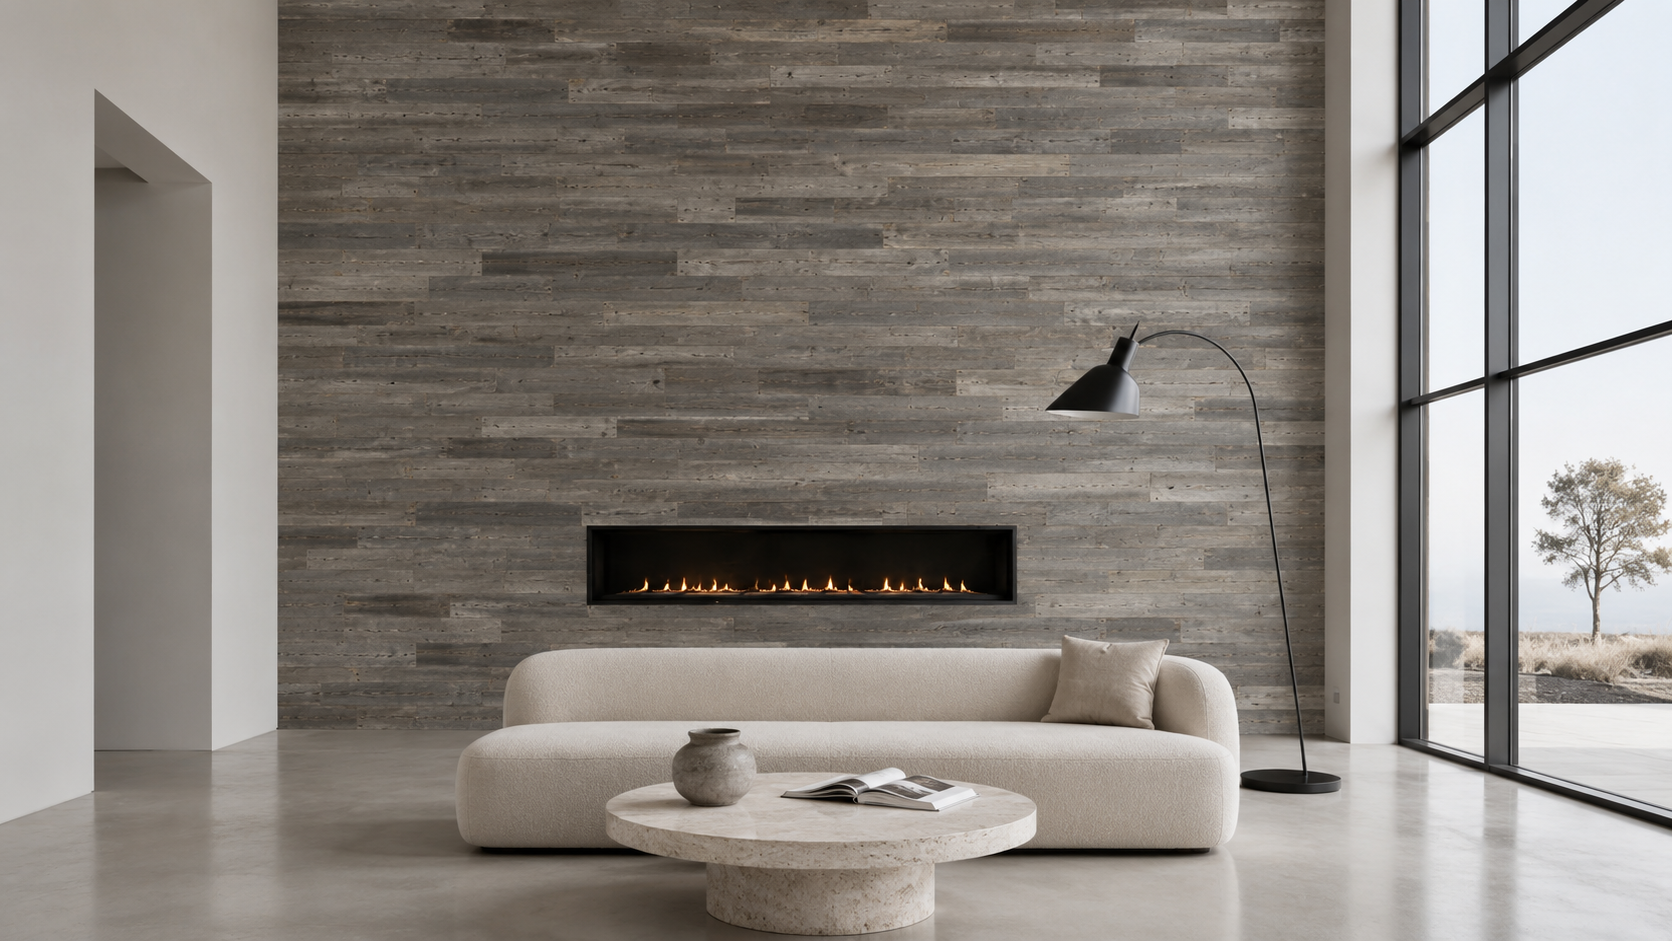
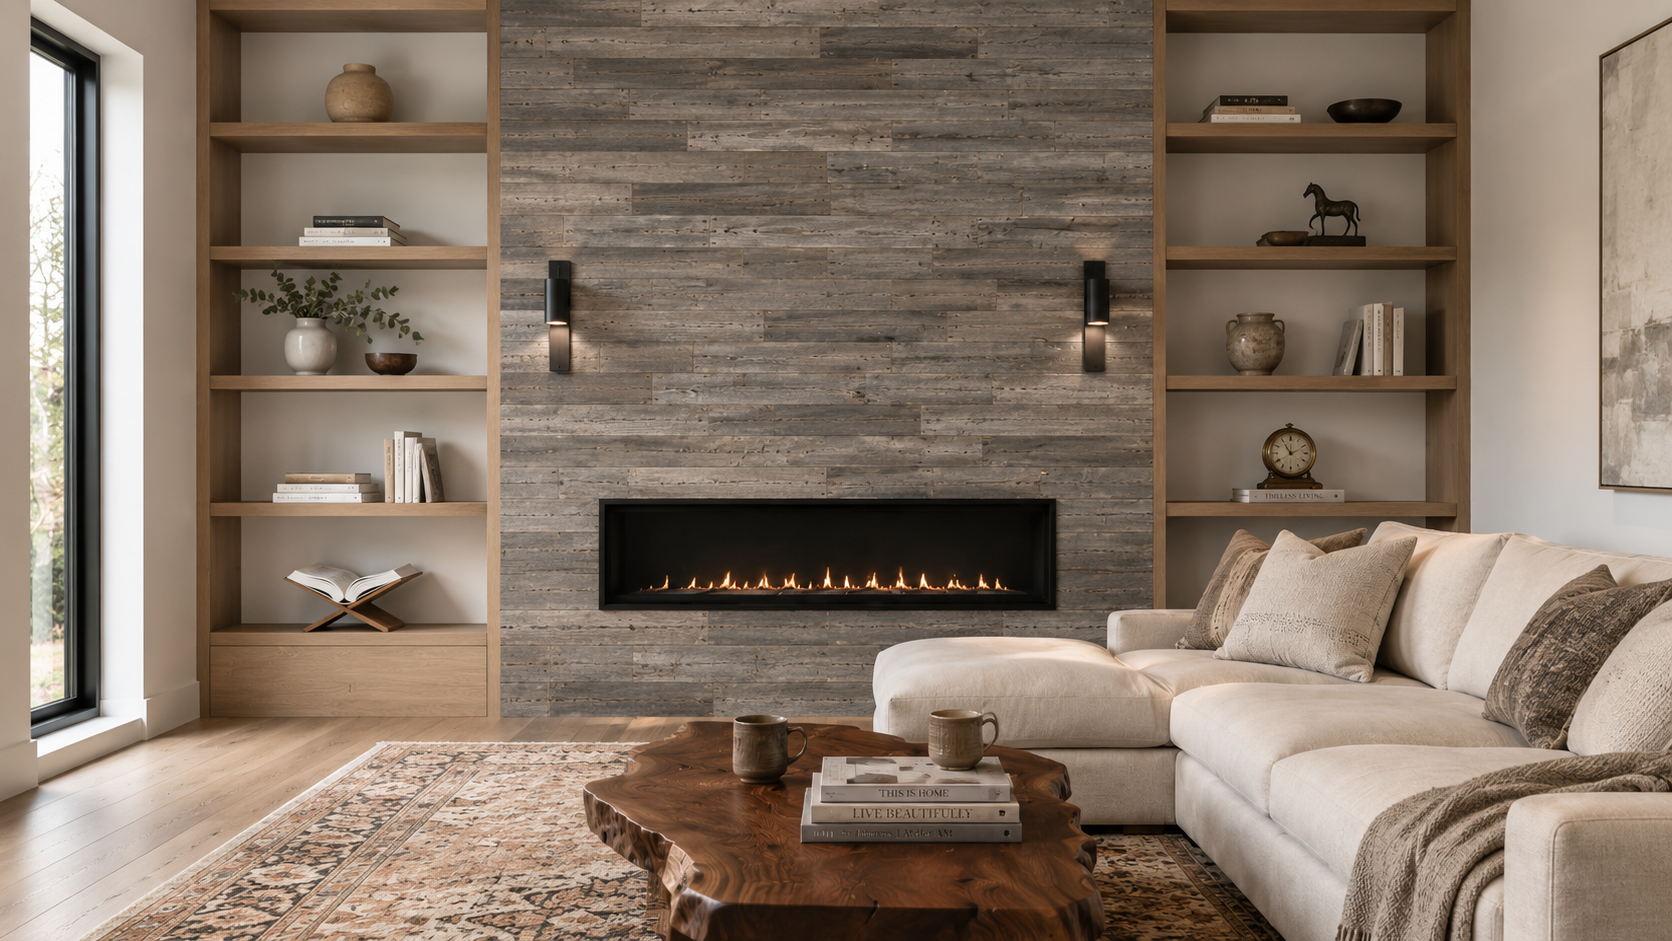
The most common modern living room layout. The reclaimed wood wall gives you a continuous, textured backdrop that flatters both the TV and the fire — without the visual clutter of a separate accent wall or a contrasting mantel above.
Mount the TV directly to the wood with a low-profile flush mount — the planks accept screws into the underlying drywall or studs the same way as any other surface. Leave 12–18 inches of clean wood between the top of the firebox and the bottom of the TV (per your firebox manufacturer’s spec) and you’re done.
Pricing is per square foot. Three quick examples to size your project:
2 boxes (20 sq ft each)
6 boxes (20 sq ft each)
14 boxes (20 sq ft each)
Free shipping on orders over $200. Order 10% extra to account for cuts — better than running short mid-install. See full cost breakdown →
If you can use a finish nailer and a stud finder, you can install a fireplace wall in a weekend.
Check your firebox spec sheet for required clearance to combustibles. Tape off the non-combustible zone immediately around the firebox — wood starts outside that line.
Use a stud finder to mark every wall stud. Snap a vertical chalk line on each one. The planks nail directly into these — or stick directly to existing brick.
Start at the floor and work upward. Cut the first plank of each row to a different length so seams stagger — no two seams stacked. Apply construction adhesive + two finish nails per plank into the stud.
Run a thin trim along the ceiling and corners to hide cut ends. Reinstall your firebox surround if you removed it. Light the fire. Send us a photo.
Six things customers ask before they buy. If you don’t see your question, drop us a note.
Yes — with respect to your firebox manufacturer’s clearance-to-combustibles spec. Every modern fireplace insert sold in North America publishes a minimum clearance: typically 6–18 inches of non-combustible material (tile, stone, steel surround) immediately surrounding the firebox, with combustible materials (including wood paneling) starting beyond that line. Our planks install outside that clearance zone the same way any wood mantel or paneling would. Wood-burning fireplaces and older masonry fireplaces require larger clearances; modern direct-vent linear gas inserts require less. Always check your specific firebox spec sheet before installing.
It depends on the specific firebox model, but modern direct-vent linear gas inserts typically require 6–12 inches of non-combustible material (tile, stone, or steel) immediately surrounding the firebox opening. Combustible materials including wood paneling can install beyond that line. Some sealed glass-front direct-vent inserts allow combustibles closer because the heat is vented externally. Check the spec sheet that came with your insert — the manufacturer publishes an exact clearance diagram that overrides any general rule.
Yes — this is one of the most common applications. Reclaimed wood planks install directly over existing brick or stone using high-strength construction adhesive on the back of each plank, with optional masonry anchors for extra hold on heavier installations. There’s no need to remove the existing brick, level the surface, or skim-coat anything. The plank’s 3/8″ thin profile means the new wood wall stays nearly flush with the existing surround.
Yes. The planks accept screws into the underlying drywall, studs, or brick the same way any other wall surface does, so a standard flush or tilt mount installs through the wood. Leave 12–18 inches of clean wood between the top of the firebox and the bottom of the TV (per your firebox manufacturer’s clearance spec for hot air vented out the top) and the TV/fire combination is a clean modern living room layout. Bonus: the textured reclaimed wood background flatters both the screen and the flames.
Reclaimed barn wood is one of the best choices: it’s naturally kiln-dried over decades, dimensionally stable, lightweight, and the random plank lengths cover any wall size without obvious seams. Engineered wood, peel-and-stick planks, and faux veneer products tend to read as plastic up close and don’t age the same way. Solid pine boards work but they’re heavier, knot-prone, and don’t carry the patina that makes a fireplace wall feel intentional and grounded.
Material cost is per square foot. A small accent strip around the firebox (~40 sq ft) takes 2 boxes; a standard 8′-tall fireplace wall (~120 sq ft) takes 6 boxes; a two-story vaulted great-room wall (~280 sq ft) takes about 14 boxes. We recommend ordering 10% extra to account for cuts. Most homeowners save 50–70% versus a contractor-installed stone or tile surround, with comparable visual impact.